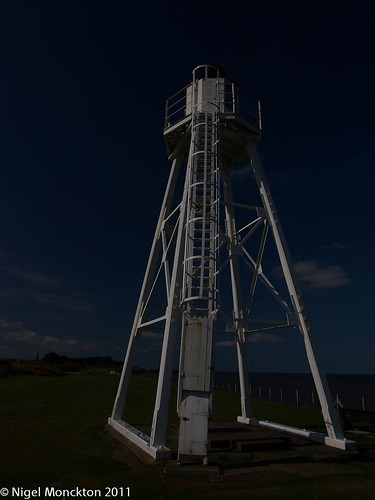
The first shot, above, at 1/800s, f8, ISO100 is clearly underexposed. It could perhaps be rescued in post processing, but as exercise 5 showed this would be at the expense of an increase in noise, which experience suggests would be particularly visible in the large areas of featureless sky. The highlight areas – for example at the top of the ladder – show a lot of detail at 100%.
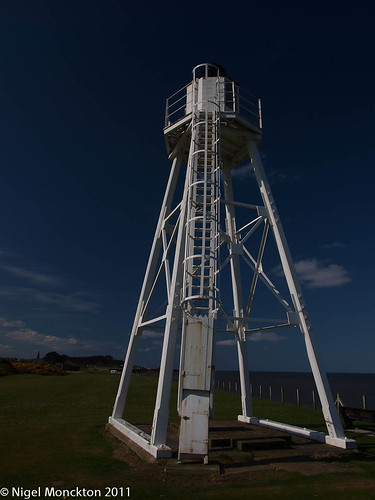
This second shot, at 1/400 sec is certainly more usable than the first, but is still rather dark. The brightest parts (the left rear leg for example) have a dark edge which separates them from the blue of the sky – not sure if this is a feature of the lens or of the processing.
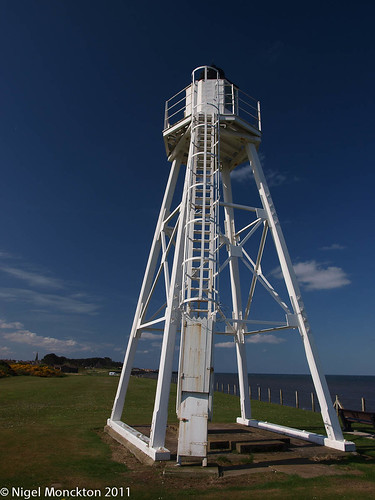
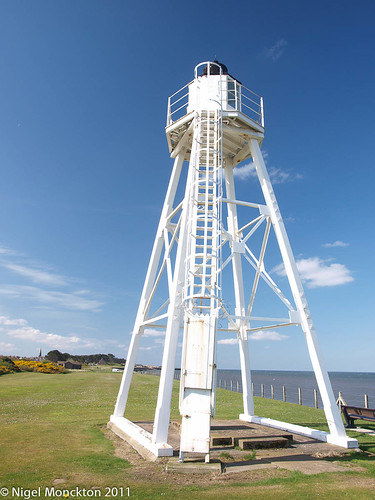
The third shot at 1/200 show a very small amount of highlight clipping – less than a few pixels in area on the computer – although somewhat greater on the camera. This is confirmed by the histogram, which scarcely touches the right-hand end. At 100% there is still visible detail in the highlight areas, and the dark fringe between the white and the sky is much reduced. This is, for want of a better term, the ‘correct’ exposure for the white structure, although it leaves the sky a little dark for my personal tastes. Less polarisation would have achieved this.
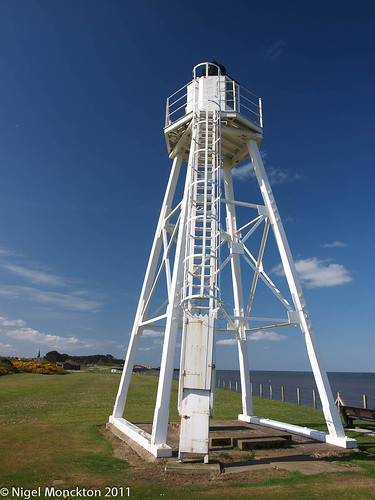
This 4th shot at 1/100 sec show significant clipping on the sunny side of the structure. There is vey clear colour fringing where the brightest areas meet the darker areas as in this example where it visible between the black and white painted areas, and the white paint and the sky.

Also, at 100% the darkness of the black areas is beginning to give way to a grey, which I find less effective. Unfortunately for this exercise there are no specular highlights in this shot so I cannot examine the way these interact with the surrounding areas. I will try to post some additional shots later to examine this aspect of highlight clipping.
The final shot in this series shows extensive burning out on the white structure to the point where it is difficult to distinguish between the rails and the structure itself at the top. In part this appears to be caused by the white area ‘spilling over’ some of the fine detail. The sky is also desaturating – losing some of its blueness – an effect which appears slightly stronger close to the burned out areas. I am sure this would have been significantly stronger without the polarising filter.
It is noticeable however, that in this picture the area of the photo around the small building at the end of the green is considerably more open and detailed in this picture than in some of the earlier ones.
Conclusion
The clear conclusion from this and the previous exercise is that if there is a clear pay-off between highlights and shadows. If you want lots of shadow detail, you risk burning out/losing detail in the highlights. If on the other hand you retain detail in the highlights you will often end up with very dark shadows. You can try lifting these in post processing, but you will only be able to achieve that at the expense of additional noise in those areas of the photo.
The range between acceptably noisy shadows and acceptably detailed highlights is the ‘dynamic range’ of the sensor and I note that there are number of exercises on this issue later in the course.
NB: The images are marked 2011 but were taken in May 2010 – I have recently uploaded them to Flickr to deal with a hosting issue.


No comments:
Post a Comment